Check-in
Warning
This blueprint is no longer maintained and is kept here for historical purposes only.
Handles check-ins to places and contact tracing for warning about COVID-19 cases.
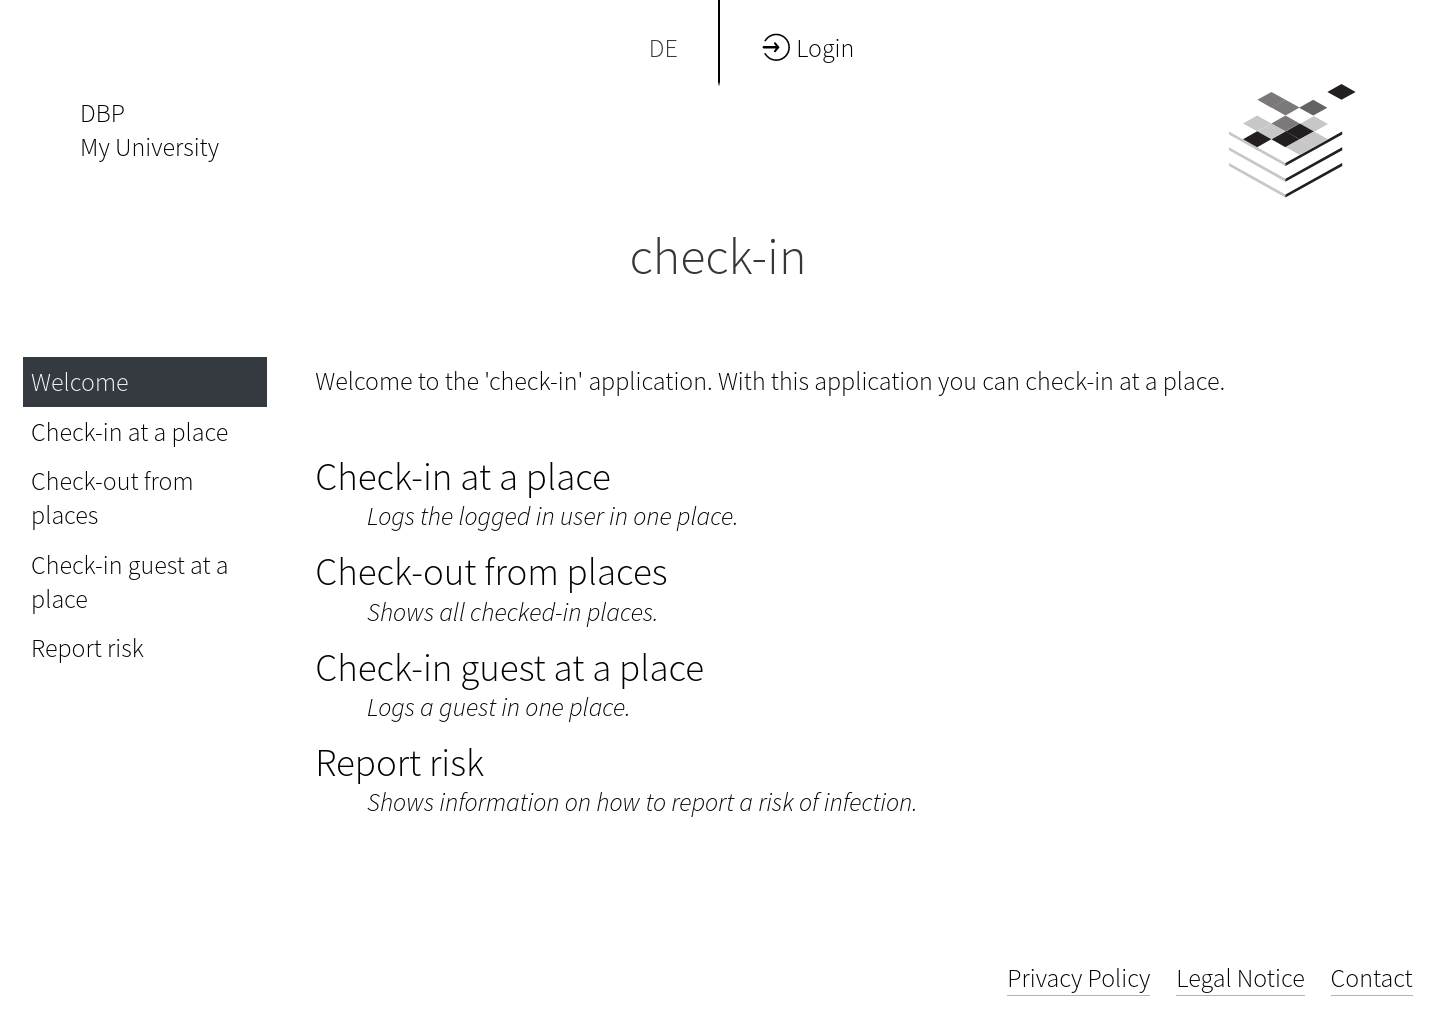
Screenshot
Example tech stack
- An LDAP server, which at least contains first name, last name, e-mail address and user id of the students
- A Keycloak server, which integrates with the LDAP server
- A MongoDB server for CampusQR
- A LAMP server (Linux, Apache, MySQL/MariaDB, PHP>=8.2)
- The dependency manager for PHP Composer 2 also needs to be installed
git>= 2.25 needs to be installed- In case that the frontend will also be hosted on the same server, then npm needs to be installed too
- Several PHP extensions need to be present:
ext-ctype,ext-dom,ext-fileinfo,ext-filter,ext-json,ext-ldap,ext-libxml,ext-mbstring,ext-openssl,ext-pcre,ext-reflection,ext-simplexml,ext-soap,ext-spl,ext-tokenizer,ext-xml,ext-mysql,ext-curl,ext-gmp - Domains (or sub-domains) along with the needed TLS/SSL certificates for the Relay API web server, the frontend web server, the CampusQR server and the Keycloak server
- A reverse proxy with ssl-termination for CampusQR
- Java JVM >= 11 (LTS)
Installation
Frontend App
You can install the frontend application with a simple command you can find on Check-in frontend installation.
To install the frontend app you need npx which should be installed using this command.
# Install nodejs packages on Debian/Ubuntu
apt-get -y --no-install-recommends install nodejs
After installing the frontend app you need to adapt the index.html file to match the branding of your organization. You can find a guide for this in the Handbook.
Keycloak Server
You need to install and set up the Open Source Identity and Access Management Keycloak, which needs to import (sync) your LDAP users.
Tip
There is small guide about the Keycloak Client Setup.
In addition to the dbp-frontend default client scope Check-in also needs a second default client scope called location-check-in, where Include in Token Scope is enabled and no additional mappers or scopes are set.
MongoDB
You need to install and set up the open source document database system MongoDB, that is used by CampusQR as backend.
- Install MongoDB: https://docs.mongodb.com/manual/administration/install-on-linux/
- Add an admin account: https://docs.mongodb.com/manual/tutorial/configure-scram-client-authentication/
If your database is on a separate server, you will additionally need to install at least a mongodb client on the server that is running CampusQR to enable CampusQR to configure the database.
Tip
If you dont want to add an admin account, an normal user with the readWrite role should work too. Guides on how to manage users, on MongoDB privileges and built-in roles are linked respectively. However, this was not tested exhaustively and thus may lead to unexpected problems.
CampusQR
You need to install and set up the digital blueprint fork of CampusQR, the open source system for contact tracing at universities.
- Download the latest build artifact
- Copy
env.example.shtoenv.shand fill it out - The
CAMPUSQR_API_TOKENcan be generated usingphp -r 'echo bin2hex(random_bytes(20))."\n";' - The specified
CAMPUSQR_API_TOKENis the secret used for accessing the CampusQR via an API and will be used later on when configuring the PHP backend. - Run
./run.shto start the service. - Consider managing it via systemd or supervisor.
Tip
To increase security make sure that the CampusQR server is only accessible in your internal network. CampusQR and its endpoints do not need to be accessible for everyone.
For supervisor you can use the following example config:
[program:campusqr]
command=/<path-to-campus-qr>/run.sh
user=user
autostart=true
autorestart=true
stopasgroup=true
killasgroup=true
See https://www.digitalocean.com/community/tutorials/how-to-install-and-manage-supervisor-on-ubuntu-and-debian-vps for a short tutorial on supervisor.
MySQL
You need to install and set up the open-source relational database management system MySQL or MariaDB, that is used for locking and the Check-in Bundle via the Symfony messenger to check out guests after a certain amount of time. You need to create a database, create a user and grant privileges for the database to the user. Guides on how to do this are linked respectively.
Relay API
This is a guide on how to set up the Relay API for Check-in.
Tip
You can find an example implementation on relay-checkin-api.
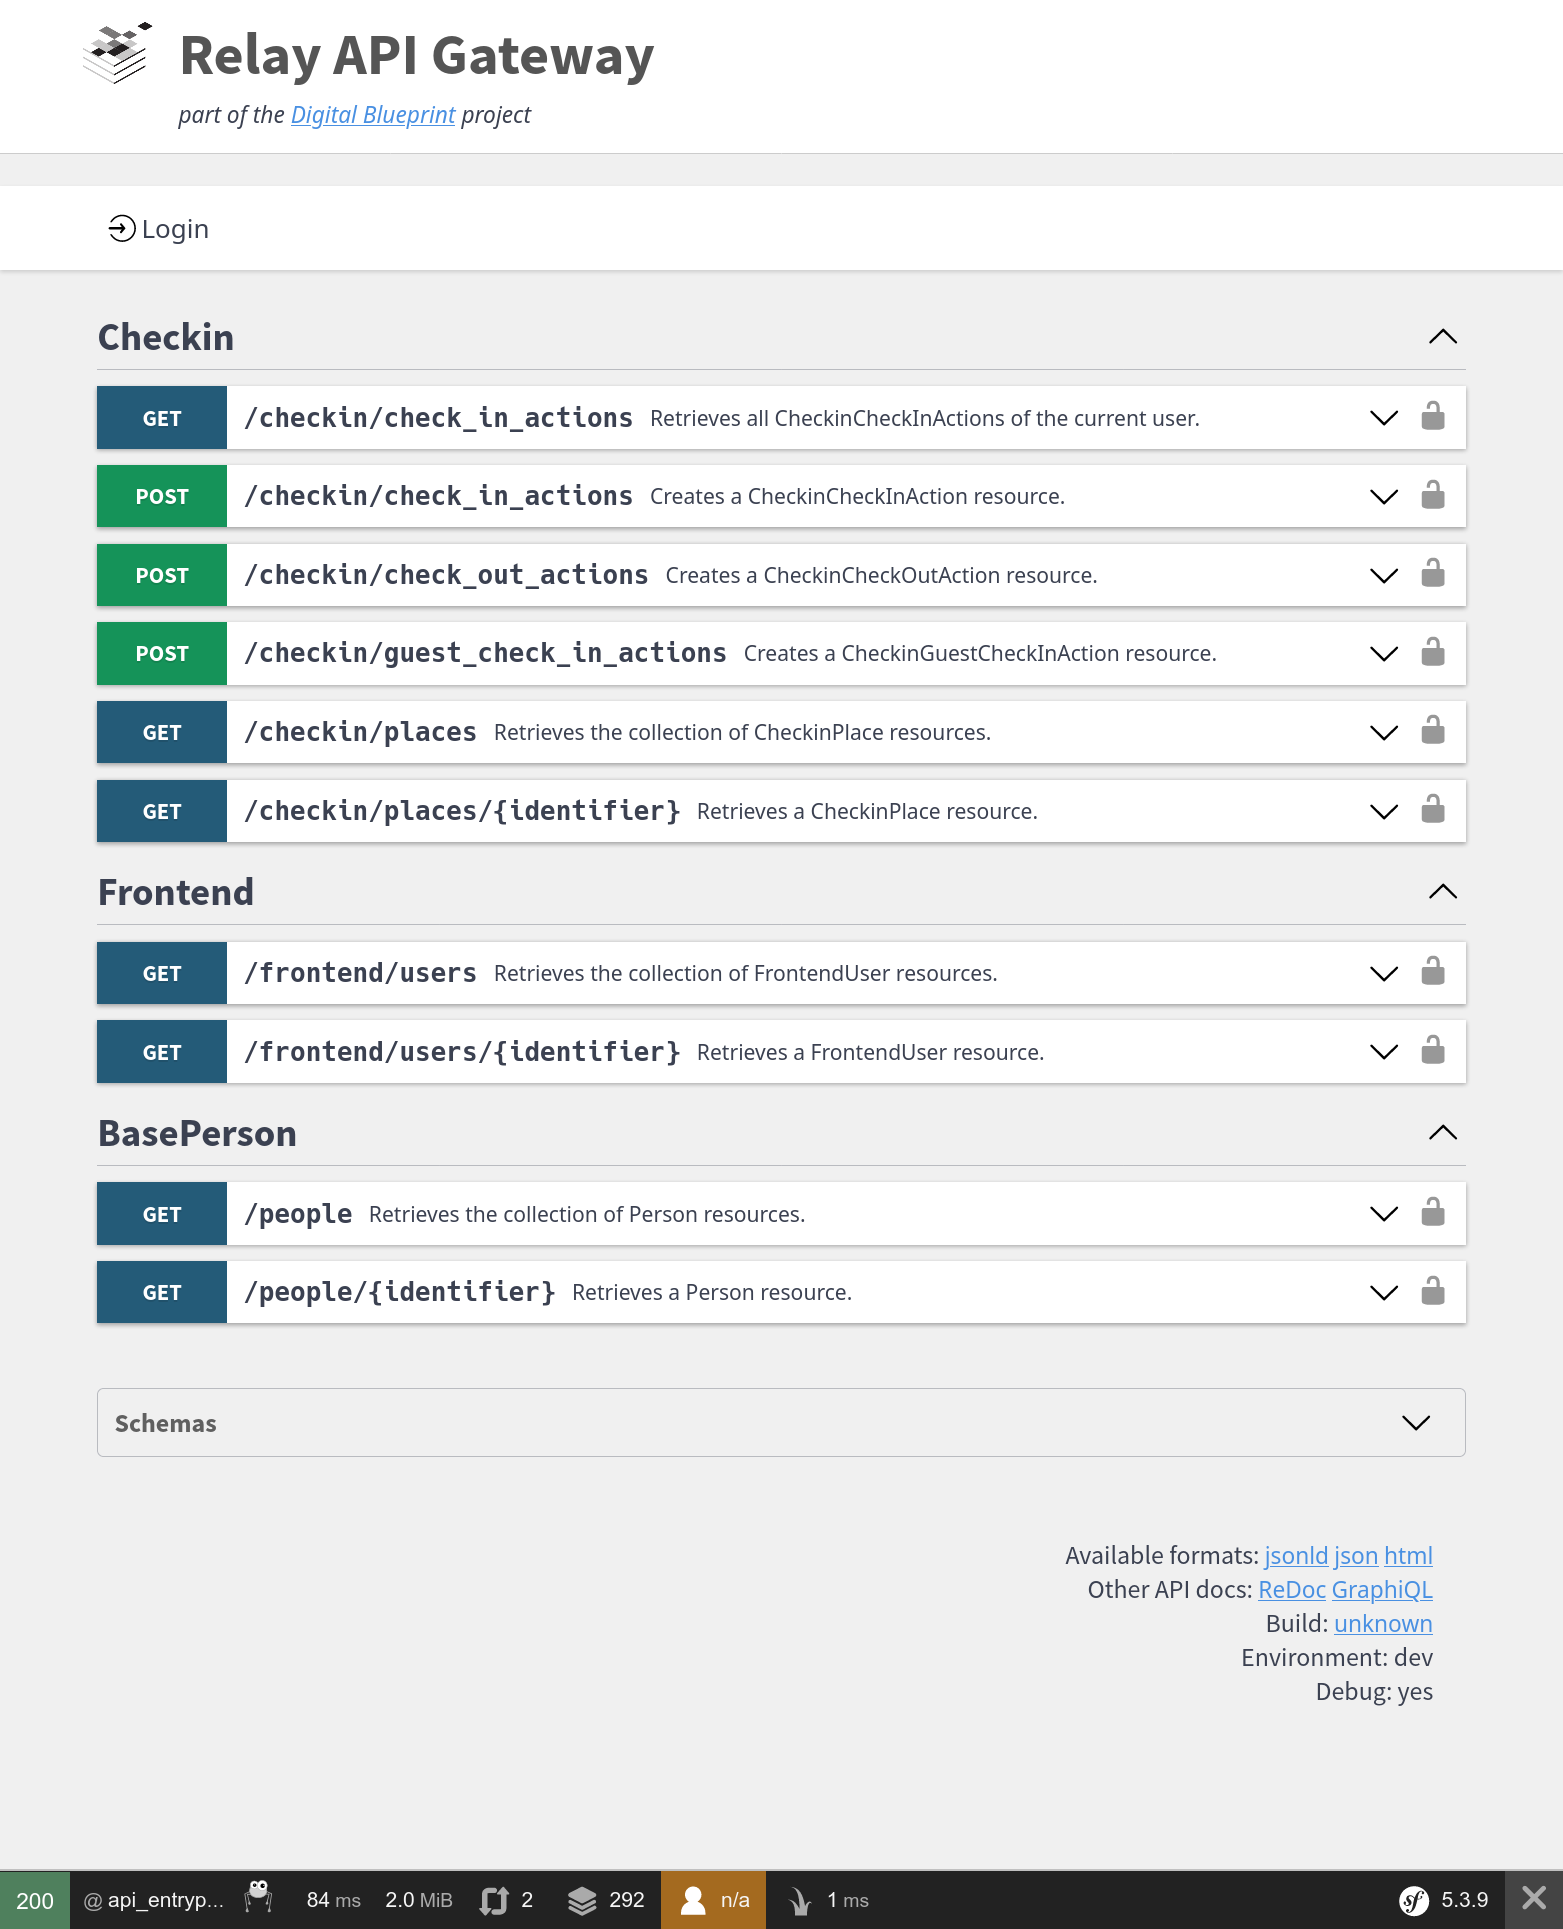
Screenshot
This is how this example will look like in the end.
PHP Modules and other packages
This should install most of the packages you will need on your webserver (if Apache and PHP are already installed):
# Install packages on Debian/Ubuntu
apt-get -y --no-install-recommends install curl sudo git php-apcu php-apcu-bc \
  php-cli php-curl php-gd php-soap php-json php-mbstring php-mysql php-opcache \
  php-readline php-xml php-intl php-zip php-fpm php-ldap php-gmp \
  openssl composer

# should show something like "PHP 8.2.x" (or higher)
php -v

# Should show something like "Composer 2.x"
composer -V
# Install Remi's RPM repository for PHP 8.2
dnf -y install https://rpms.remirepo.net/enterprise/remi-release-8.rpm

# Install PHP 8.2
dnf -y module install php:remi-8.2

# Install packages on Redhat/CentOS
dnf -y install curl composer php php-apcu php-bcmath php-cli php-curl php-gd \
  php-soap php-json php-mbstring php-mysqlnd php-opcache php-readline php-xml \
  php-intl php-zip php-mysql php-fpm php-ldap php-gmp openssl sudo git

# should show something like "PHP 8.2.x" (or higher)
php -v

# Should show something like "Composer 2.x"
composer -V
Warning
Please make sure you have installed PHP with at least version 8.2, Composer version 2 and Git with at least version 2.25!
Apache Webserver configuration
First you need to enable the Apache Rewrite and Headers modules so all requests can be redirected to the index.php with modified headers.
# enable mod rewrite
a2enmod rewrite
# enable mod headers
a2enmod headers
In your virtual host configuration you need to allow .htaccess files and set your DocumentRoot to the public directory.
Note that in this example /[VHOST-ROOT]/relay-api will be the path where the PHP application resides.
Warning
You need to replace /[VHOST-ROOT] with the root path of your virtual hosts!
# Allow .htaccess
<Directory /[VHOST-ROOT]/relay-api>
        Options Indexes FollowSymLinks
        AllowOverride All
        Require all granted
</Directory>

# Set DocumentRoot to public directory
<VirtualHost *:80>
    DocumentRoot "/[VHOST-ROOT]/relay-api/public"
    ServerName api.your-domain

    # Other directives here ...
</VirtualHost>
You now can restart your web server with:
sudo service apache2 restart
App and bundle install
We will use the DBP API Server Template as starting point for our implementation.
Tip
Keep in mind that your current user needs to have permissions to
create files and directories in the /[VHOST-ROOT] directory for this example.
# You need to replace "/[VHOST-ROOT]" with the root path of your virtual hosts!
# And keep in mind that your current user needs to have permissions to
# create files and directories in the "/[VHOST-ROOT]" directory.
cd /[VHOST-ROOT]

# Install the DBP API Server Template (https://github.com/digital-blueprint/relay-server-template)
# as base Symfony PHP application
# The relay-api/public directory then is the directory to let the webserver point at
composer create-project dbp/relay-server-template relay-api

# Change to app directory
cd relay-api

# Install the Base Person Bundle (https://github.com/digital-blueprint/relay-base-person-bundle),
# which contains entities required by many bundles for the DBP Relay project.
composer require dbp/relay-base-person-bundle

# If you are using LDAP as your source for identity management, you can install and configure the
# BasePerson Connector Bundle for LDAP (https://github.com/digital-blueprint/relay-base-person-connector-ldap-bundle),
# which allows you to connect the Base Person Bundle to your LDAP server.
composer require dbp/relay-base-person-connector-ldap-bundle

# Install the Frontend Bundle (https://github.com/digital-blueprint/relay-frontend-bundle),
# which contains APIs mostly useful for frontend apps.
# It is a required dependency for all DBP frontend apps.
composer require dbp/relay-frontend-bundle

# Install the Check-in Bundle (https://github.com/digital-blueprint/relay-checkin-bundle),
# which allows you to talk to the CampusQR backend.
composer require dbp/relay-checkin-bundle
Tip
Executing composer check-platform-reqs shows that the required PHP extensions are installed.
Core bundle config
You need to configure the Core Bundle, which contains functionality like error handling, logging, locking and a message queue configuration, that is required by all bundles for the DBP Relay project.
There are multiple backends to choose from (MySQL, Redis, ...) on how to persist data, see Check-in Bundle Configuration on how to configure them.
You need to have a system in place to run the message queue workers. Symfony recommends to use Supervisor to do this. You can use the example configuration to help you with the setup process.
Warning
Keep in mind that you need to restart the message queue workers when you deploy Relay API updates to your server, so changes to the messaging system can be picked up.
You can just stop the workers with `php bin/console
dbp:relay:core:queue:restart`, then Supervisor will start them again.
OIDC Bundle config
Follow the these steps to configure the OIDC Bundle: Configure the Core Connector OIDC Bundle
Checkin Bundle config
You need to Configure the Checkin Bundle, so it can talk to CampusQR.
Adapt all CAMPUS_QR_ settings in your .env.
CAMPUS_QR_URL=https://campusqr.domain
CAMPUS_QR_TOKEN=
CAMPUS_QR_URLis the URL where the CampusQR backend is reachableCAMPUS_QR_TOKENis the API secret you have previously specified when setting up CampusQR (CAMPUSQR_API_TOKENinenv.sh)
Best put the CAMPUS_QR_TOKEN into an .env.local to avoid it being commited to the git repository.
Connect Base Person Bundle to your infrastructure
You need to implement a service for PersonProviderInterface from Base Person Bundle.
Tip
If you are using LDAP as your source for identity management, you can install the BasePerson Connector Bundle for LDAP, which allows you to connect the Base Person Bundle to your LDAP server.
There is a guide at [BasePerson Connector Bundle for LDAP](../components/api/base-person-connector-ldap/config.md),
that walks you through the steps to set up the LDAP connector.
Afterwards best do a composer install to make sure caches are cleared and everything is in order.
Health Checks
If you are finished setting up and configuring the API server you can run the builtin health checks to ensure that all external systems are reachable and correctly hooked up.
Simply run the following in the API server directory:
./bin/console dbp:relay:core:check-health
If everything is working it should print something like:
[auth]
  Check if the OIDC config can be fetched: [SUCCESS]
  Check if the OIDC public key can be fetched: [SUCCESS]
  Check if the OIDC server time is in sync: [SUCCESS]
[base-person-connector-ldap]
  Check if we can connect to the LDAP server: [SUCCESS]
[checkin]
  Check if CampusQR is reachable: [SUCCESS]
  Check if we can use the CampusQR API: [SUCCESS]
[core.lock]
  Check if the locking works: [SUCCESS]
[core.queue]
  Check if the queue is configured: [SUCCESS]
[core.symfony]
  APP_SECRET should be set: [SUCCESS]
  APP_ENV should be set to 'prod': [SUCCESS]
[core.system]
  Check if DNS is working: [SUCCESS]
  Check if TLS is working: [SUCCESS]
Debugging
You can find an detailed guide on debugging in the Handbook.
Tip
Many unspecific or hard to debug errors can be dealt with by clearing the Symfony cache using ./bin/console cache:clear.
Warning
Never run Symfony in debug mode in production! Debug mode allows clients to freely access all configuration, including all secrets. Never enable it on a publicly accessible server!
Running in Production
When you are done with setting things up please visit Running in Production to learn how to run the Relay API in production.
Backups
After everything is up and running, you should consider to regularily create backups of your MongoDB and MySQL/MariaDB databases.
In case of data loss, these backups can be used to restore the databases easily.
mysqldump and mongodump are two programs which are widely used for backups.
Some resources are given here, but note that backups heavily depend on your specific configurations and environment.
mysqldump:
- https://mariadb.com/kb/en/making-backups-with-mysqldump/
- https://medium.com/@ClusterEngine/performing-backup-of-a-live-mysql-database-using-mysqldump-4bc159cb75b7
- https://mariadb.com/kb/en/backup-and-restore-overview/
mongodump:
- https://www.mongodb.com/docs/manual/tutorial/backup-and-restore-tools/
- https://medium.com/@eboye/mongodb-auto-backup-via-cronjob-737e096c8470
It is recommended to create backups frequently, e.g. every day. However, the frequency of the backups and how long backups are stored before deleting them depends heavily your privacy policy. Therefore a concrete recommendation cannot be given here.
All done
🥳 Now your Check-in application is ready to be used 🥳